Wine >> C/C++ >> Painting
Device Context BitBlt
參考資訊:
1. win32
2. petzold
3. tutorial
4. examples_win32
Device Context(DC)是一個可以用繪製圖形的裝置,當創建一個新的Windows視窗時,系統也會創建一個DC用來提供繪製圖形的功能,DC只是一個裝置,它需要一塊Buffer用來儲存需要顯示的圖形(像素),系統預設也會幫Window視窗配置一塊可以用來儲存像素的Buffer,這也是為何可以直接在視窗上面繪製圖形的緣故,需要注意的是,當使用CreateDC()、CreateCompatibleDC()創建一個新的DC時,這樣的DC預設並沒有Buffer可以使用,所以,需要使用CreateBitmap()、CreateCompatibleBitmap()配置Buffer,這樣才可以在這個DC上面繪製圖形
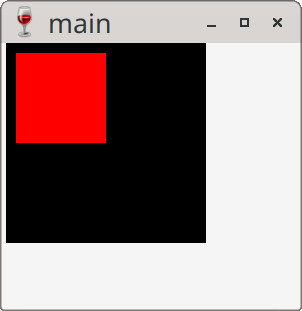
針對像素的處理,如果需要對像素進行搬移或者複製,除了可以使用迴圈的方式之外,BitBlt()是一個不錯的選擇方式,BitBlt()可以用來複製某個區間範的像素到另一個地方去,例如:複製(x=10, y=10, width=100, height=100)的像素到(x=100, y=100)位置,司徒使用如下範例說明如何使用BitBlt()
main.c
#include <windows.h>

HWND hWin = NULL;
WNDPROC defWndProc = NULL;

LRESULT CALLBACK WndProc(HWND hWnd, UINT uMsg, WPARAM wParam, LPARAM lParam)
{
    int x = 0, y = 0;
    HDC hDst = NULL;
    HDC hSrc = NULL;
    HBITMAP hBmp = NULL;
    PAINTSTRUCT ps = {0};

    switch (uMsg) {
    case WM_CLOSE:
        DestroyWindow(hWnd);
        return 0;
    case WM_DESTROY:
        PostQuitMessage(0);
        return 0;
    case WM_PAINT:
        hDst = BeginPaint(hWnd, &ps);
        hSrc = CreateCompatibleDC(hDst);
        hBmp = CreateCompatibleBitmap(hDst, 200, 200);

        SelectObject(hSrc, hBmp);
        for (y = 10; y < 100; y++) {
            for (x = 10; x < 100; x++) {
                SetPixel(hSrc, x, y, RGB(0xff, 0x00, 0x00));
            }
        }
        BitBlt(hDst, 0, 0, 200, 200, hSrc, 0, 0, SRCCOPY);

        EndPaint(hWnd, &ps);
        DeleteObject(hBmp);
        DeleteDC(hSrc);
        break;
    }
    return CallWindowProc(defWndProc, hWnd, uMsg, wParam, lParam);
}

int WINAPI WinMain(HINSTANCE hInstance, HINSTANCE hPrevInstance, LPSTR lpCmdLine, int nCmdShow)
{
    hWin = CreateWindow(WC_DIALOG, "main",
        WS_OVERLAPPEDWINDOW | WS_VISIBLE, 0, 0, 300, 300, NULL, NULL, NULL, NULL);
    defWndProc = (WNDPROC)SetWindowLongPtr(hWin, GWLP_WNDPROC, (long int)WndProc);

    MSG msg = {0};
    while (GetMessage(&msg, NULL, 0, 0)) {
        DispatchMessage(&msg);
    }
    ExitProcess(0);
    return 0;
}
Line 23:創建一個DC
Line 24:創建DC的Buffer
Line 27~31:紅色像素
Line 32:使用BitBlt()複製像素到另一個DC
編譯、執行
$ winegcc main.c -o main -lgdi32
$ wine ./main.exe