RetroGame
如何替換UBoot圖片
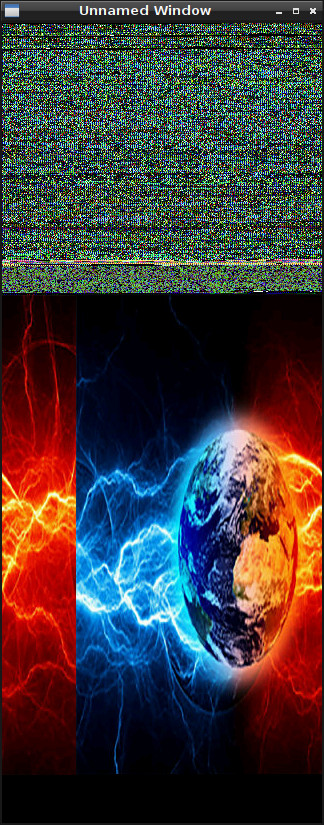
Uboot開機顯示圖片如下所示:
雖然官方並沒有開放UBoot程式碼,不過,為了可以換掉開機圖片,司徒想到一個可以使用trial and error的方式,定位出位該圖片的位置,那就是依序將Binary資料當作Pixel顯示,藉此定位出該圖片位置。
show_bin.c
#include <stdio.h>
#include <stdlib.h>
#include <string.h>
#include <fcntl.h>
#include <sys/mman.h>
#include <unistd.h>
#include <errno.h>
#include <termios.h>
#include <unistd.h>
#include <SDL.h>
#include <SDL_image.h>
#include <SDL_ttf.h>

uint16_t buf[10 * 1024 * 1024]={0};

int main(int argc, char* argv[])
{
  SDL_Init(SDL_INIT_VIDEO);
  SDL_ShowCursor(0);
  SDL_Surface *screen = SDL_SetVideoMode(320, 800, 16, SDL_SWSURFACE);

  int fd = open(argv[1], O_RDONLY);
  long len = read(fd, buf, sizeof(buf));
  close(fd);

  // uboot image: 176148
  long index=0;
  for(int c=0; c<len/(320*800*2); c++){
    uint16_t *p = screen->pixels;
    for(int y=0; y<320; y++){
      for(int x=0; x<800; x++){
        *p++ = buf[index++];
      }
    }
    SDL_Flip(screen);
    SDL_Delay(3000);
  }
  SDL_Quit();
  return 0;
}
編譯程式
$ gcc show_bin.c -g -o show_bin -lSDL_image -lSDL -lSDL_ttf -I/usr/include/SDL
$ sudo dd if=/dev/sdx of=head.img bs=1M count=8
$ ./show_bin head.img
Uboot image offset: 176148
接著寫一個Image轉Hex的程式,替換自己喜愛的圖片,使用的方式也很簡單,經由SDL載入圖片(這樣就不用煩惱PNG/JPEG Library相容問題),然後把Pixel像素存成檔案,最終透過dd指令,把存好的檔案覆蓋回原本MicroSD,Image轉Hex程式如下所示。
img2hex.c
#include <stdio.h>
#include <stdlib.h>
#include <string.h>
#include <fcntl.h>
#include <sys/mman.h>
#include <unistd.h>
#include <errno.h>
#include <termios.h>
#include <unistd.h>
#include <SDL.h>
#include <SDL_image.h>
#include <SDL_ttf.h>

uint16_t buf[320*480*2]={0};

int main(int argc, char* argv[])
{
  SDL_Init(SDL_INIT_VIDEO);
  SDL_ShowCursor(0);
  SDL_Surface *screen = SDL_SetVideoMode(320, 480, 16, SDL_SWSURFACE);

  SDL_Surface* img = IMG_Load(argv[1]);
  SDL_Surface *p = SDL_ConvertSurface(img, screen->format, 0);
  SDL_SoftStretch(p, NULL, screen, NULL);
  SDL_FreeSurface(img);
  SDL_FreeSurface(p);
  SDL_Flip(screen);

  long index=0;
  uint16_t *px = screen->pixels;
  for(int y=0; y<320; y++){
    for(int x=0; x<480; x++){
      buf[index++] = *px++;
    }
  }

  int fd = open("hex.bin", O_CREAT | O_WRONLY, S_IRUSR);
  long len = write(fd, buf, 320*480*2);
  close(fd);

  SDL_Delay(3000);
  SDL_Quit();
  return 0;
}
編譯程式
$ gcc img2hex.c -g -o img2hex -lSDL_image -lSDL -lSDL_ttf -I/usr/include/SDL
$ ./img2hex xxx.jpg
$ sudo dd if=hex.bin of=/dev/sdx bs=1 seek=176148 conv=notrunc
替換後,開機的第一張UBoot圖片就是使用者更換的圖片,當然,充電圖片也是可以換的,方法如上面的步驟。
P.S. 第二張圖片是從Kernel顯示的,因此,必須解壓縮uImage才可以替換。
返回上一頁